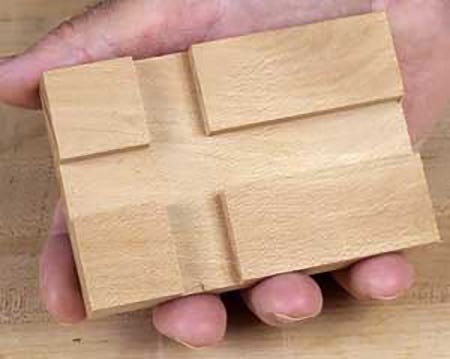
How to Cut Dado Joints with a Router Table

How to Cut Dado Joints with a Router Table

Cutting Dado Joints with a Router Table

Dado joints, also known as "housing joints," are strong and visually appealing woodworking joints that create a channel or groove to receive a piece of wood. Router tables are a convenient and precise way to cut these joints, offering a safe and controlled environment for your project. This article will guide you through the process of cutting dado joints with your router table.

Setting Up Your Router Table

Before you begin, ensure your router table is securely set up and your work area is clean. Here's how to prepare for cutting dados:

Choosing the Right Router Bit

For cutting dado joints, you'll need a dado set, which consists of multiple cutters that create a wider groove. These sets come in various sizes, so choose one that matches your project's requirements. Ensure the cutters are sharp and free from damage for a smooth and accurate cut.

Adjusting the Fence and Router Bit Height

Set the fence on your router table to the width of your desired dado. This dictates the groove's width. Adjust the router bit's height so that it protrudes just enough to create the desired dado depth. Remember to factor in the thickness of your wood when determining the bit's height.

Setting up a Guide

A guide is essential for accurate dado cutting. You can use a simple push block, a shop-made jig, or a dedicated dado jig for precise alignment. The guide should align with the fence, ensuring the dado cuts are parallel to the edge of your workpiece.

Cutting the Dado Joint

Now that your router table is set up, you can begin cutting the dado joints:

Cutting the First Pass

Position your workpiece against the fence and guide, ensuring it's securely held down. Make the first pass, cutting a portion of the dado. Keep the router running at a constant speed, ensuring smooth movement across the workpiece.

Cutting Subsequent Passes

To achieve the desired dado depth, you'll likely need to make multiple passes. After each pass, adjust the fence slightly to move the cutting path inward. This helps ensure the dado is consistent throughout its length.

Cleaning Up the Dado

After completing all passes, you might need to clean up the dado with a chisel or a hand plane. This ensures a smooth and uniform groove for a perfect fit with your other workpiece.

Tips for Success

Here are some additional tips to enhance your dado cutting with a router table:

  • Use a sacrificial board: Protect your router table's surface by placing a sacrificial board beneath your workpiece. This prevents damage to the table surface and allows for easier clean-up.
  • Cut multiple dados at once: For repeated dado cuts, create a jig to hold multiple workpieces in alignment. This improves efficiency and ensures consistency across multiple cuts.
  • Practice first: Before starting your project, practice cutting dados on scrap wood to refine your technique and ensure a smooth workflow.

Safety Considerations

Safety is paramount when working with power tools. Here are some precautions to take when cutting dados on a router table:

  • Always wear eye protection: Protect your eyes from flying debris and wood chips. Consider using a face shield for added safety.
  • Keep your fingers clear: Never place your fingers near the router bit while it's in operation. Use push sticks or a guide to guide the workpiece safely.
  • Disconnect the router: Always unplug the router when making adjustments or cleaning the table. Never attempt to clean or adjust the router while it's powered on.

By following these tips and precautions, you can safely and efficiently cut dado joints on your router table, producing stunning results for your woodworking projects.

Read More..

Functional Toolbox Organizer Ideas for Every Budget

Functional Toolbox Organizer Ideas for Every Budget

Functional Toolbox Organizer Ideas for Every Budget

Let’s face it: a messy toolbox is a recipe for frustration. You waste precious time searching for that elusive wrench, and the chaos can make even the simplest task feel overwhelming. But fear not, fellow DIYers! It’s time to ditch the disorganized mess and embrace a functional toolbox organization system that will have you saying, "Where did that extra hour come from?"

This guide will take you through a variety of toolbox organizer ideas for every budget, from clever hacks to dedicated systems. Whether you're a seasoned pro or a weekend warrior, we've got you covered.

DIY Toolbox Organizers: Unleash Your Creativity

Who says organization has to be expensive? With a little creativity and some recycled materials, you can whip up a DIY toolbox organizer that works wonders for your tools.

Repurposed Containers

Take a look around your house for containers that can be transformed into tool organizers. Think empty plastic tubs, shoeboxes, or even those pesky cardboard tubes from wrapping paper!

  • Plastic containers are great for holding small items like screws, nuts, and bolts. You can even label them with masking tape or permanent markers for easy identification.
  • Shoeboxes can be repurposed into dividers for larger tools, helping you keep your hammers, screwdrivers, and pliers separated.
  • Cardboard tubes can be sliced and used to store drill bits, screwdrivers, or other long tools.

Magnetic Strips

Magnetic strips are a lifesaver for organizing metal tools. Simply attach the strip to the inside of your toolbox lid or to a wall, and let your tools magically hang themselves in place.

Pro tip: You can even attach magnetic strips to the back of a toolbox drawer to keep your tools accessible and organized.

Affordable Toolbox Organizers

For those who prefer ready-made solutions without breaking the bank, there are plenty of affordable options available.

Tool Trays and Dividers

Tool trays and dividers are a simple yet effective way to keep your toolbox organized. They come in various sizes and materials, allowing you to customize your storage needs.

Drawer Organizers

Drawer organizers are a great solution for smaller tools and accessories. You can find a wide array of drawer organizers in different materials like plastic, metal, or wood, and they can often be customized to fit your specific toolbox drawers.

High-End Toolbox Organizers

If you're looking for a top-of-the-line toolbox organization solution that's built to last, consider investing in specialized organizers from reputable brands.

Rolling Tool Cabinets

Rolling tool cabinets are ideal for professionals and serious DIY enthusiasts. They offer ample storage space and are equipped with drawers, shelves, and sometimes even a work surface. Many models feature ball-bearing slides for smooth operation and heavy-duty construction for long-lasting use.

Modular Tool Storage Systems

Modular tool storage systems are highly customizable and can adapt to your specific needs. These systems typically include a variety of bins, drawers, and shelves that can be combined and rearranged to create the perfect storage solution. Many systems are compatible with a range of tool brands, ensuring that all your tools have a designated home.

Organization Tips to Keep Your Toolbox Tidy

Once you've chosen your organizer system, it's time to put your organization skills to the test. Here are a few tips to help you keep your toolbox tidy:

  • Clean it out: Before organizing, take the time to give your toolbox a thorough cleaning. Remove any dust, debris, or unused items that are taking up precious space.
  • Categorize your tools: Group similar tools together. For example, you could have a section for wrenches, another for screwdrivers, and so on. This will make it easier to locate the tool you need.
  • Use labels: Label containers, drawers, and sections to make it easy to find your tools. You can use adhesive labels, masking tape, or even permanent markers.
  • Keep it tidy: Make a habit of putting tools away immediately after use. This will help to prevent clutter and keep your toolbox organized.

Commonly Asked Questions

Q: What's the best way to organize small tools?

A: For small tools like screws, nuts, and bolts, consider using containers like plastic tubs, tackle boxes, or even egg cartons. You can label them to easily identify the contents.

Q: How do I organize long tools like screwdrivers and drill bits?

A: Long tools can be stored in vertical organizers, drawers with dividers, or even in cardboard tubes.

Q: What if I don't have a lot of space?

A: Even if you have limited space, you can still organize your toolbox effectively. Consider using wall-mounted organizers, hanging tool racks, or even repurposed containers to maximize your storage space.

Q: Should I invest in a high-end toolbox organizer?

A: The decision depends on your budget and needs. If you use your toolbox frequently and require a durable and customizable solution, investing in a high-end organizer might be worthwhile. However, there are plenty of affordable and effective options available as well.

Remember, organization is a journey, not a destination. The key is to find a system that works for you and that you can maintain. So go forth, DIYers, and create a toolbox that's as efficient and satisfying as your projects!

Read More..

Toolbox Organizers with Compartments for Extra Storage

Toolbox Organizers with Compartments for Extra Storage

Maximize Your Toolbox Efficiency with Compartmentalized Organizers

Are you tired of rummaging through a chaotic toolbox, wasting precious time searching for the right tool? A well-organized toolbox is a game-changer for any DIY enthusiast, professional, or simply someone who values efficiency. Enter the realm of toolbox organizers with compartments â€" a solution that transforms your toolbox from a jumbled mess into a haven of order and accessibility.

Why Choose Compartmentalized Organizers?

Toolbox organizers with compartments offer numerous advantages that elevate your tool management experience:

Enhanced Organization and Efficiency

Imagine a toolbox where every tool has its designated spot. No more digging through piles of screwdrivers or hunting for that elusive wrench. Compartmentalized organizers create a system of order, allowing you to locate the tool you need instantly, saving you time and frustration.

Improved Tool Protection

Tools are often delicate instruments that require proper storage. Individual compartments prevent tools from clanging against each other, reducing the risk of damage and ensuring their longevity.

Increased Storage Capacity

Compartmentalized organizers make the most of your toolbox space. They maximize storage capacity by utilizing every nook and cranny, allowing you to carry a wider range of tools without sacrificing organization.

Types of Compartmentalized Organizers

The world of toolbox organizers offers a variety of options to suit your needs. Here are some popular types:

Drawers

Drawer organizers are perfect for storing smaller tools like screwdrivers, sockets, and bits. The drawers provide a secure and easily accessible way to keep these essentials organized.

Trays

Trays with individual compartments are ideal for larger tools like wrenches, pliers, and hammers. They allow for easy viewing and selection of tools, ensuring you can grab the right one quickly.

Roll-Up Organizers

Roll-up organizers are a great option for mobile toolkits. These organizers compactly roll up and have various pockets and compartments for holding tools of different sizes.

Tips for Choosing the Right Organizer

To select the perfect organizer for your toolbox, consider the following factors:

  • Size and Dimensions of Your Toolbox: Measure your toolbox to ensure the organizer fits comfortably and doesn't take up too much space.
  • Type of Tools You Need to Store: Think about the size and shape of your tools and choose an organizer with compartments that accommodate them.
  • Material: Consider the material of the organizer. Durable and impact-resistant materials like plastic or metal are ideal for protecting your tools.
  • Budget: Toolbox organizers come in a range of prices. Set a budget and look for an organizer that offers the features you need within your price range.

Conclusion

Investing in a compartmentalized toolbox organizer is an investment in your time, efficiency, and the longevity of your tools. By creating a system of order within your toolbox, you'll save time, reduce frustration, and enjoy a more productive experience whether you're a seasoned professional or a weekend DIYer.

Read More..

Simple Wine Rack Projects That Look Expensive

Simple Wine Rack Projects That Look Expensive

Simple Wine Rack Projects That Look Expensive

A well-stocked wine collection deserves a home as elegant as its contents. But who says that a stunning wine rack must come with a hefty price tag? With a little creativity and the right materials, you can build a simple wine rack that will impress your guests and add a touch of sophistication to your home.

This guide will explore several simple wine rack projects that appear expensive but are surprisingly affordable to build. We'll cover various styles, materials, and construction techniques to inspire your DIY journey.

Choosing Your Materials

The right materials are crucial for creating a wine rack that looks both stylish and durable. Consider these options:

Wood

  • Reclaimed wood: Adds a rustic charm and eco-friendly touch. Look for salvaged planks, pallets, or even old furniture.
  • Pine: A budget-friendly choice that accepts stain and paint well. Consider knotty pine for a more rustic look.
  • Maple or Cherry: Offers a rich, natural beauty and stands up to wear and tear. These options are more expensive but worth considering for a long-lasting piece.

Metal

  • Iron: Provides a strong and industrial aesthetic. You can find pre-made iron rods or sheets for your rack.
  • Copper: Creates a warm, elegant look and develops a beautiful patina over time. Copper pipes are a popular choice for simple rack designs.

Acrylic

  • Clear Acrylic: Creates an invisible, modern aesthetic. You can find pre-cut acrylic sheets at most hardware stores.

Easy and Affordable Wine Rack Designs

Here are some simple wine rack projects that you can tackle with basic tools and skills.

Simple Wooden Rack

  • Materials: Pine boards, wood glue, screws, stain or paint (optional)
  • Construction: Cut the boards into desired lengths. Use wood glue and screws to attach the boards together to form a rectangular frame. Add horizontal support pieces to create bottle slots. Finish with stain or paint for a custom look.
  • Cost: $10-$25 (depending on wood type)

Industrial Pipe Rack

  • Materials: Iron pipe, pipe fittings, brackets, wood (optional)
  • Construction: Cut the pipe to desired lengths and use fittings to create a framework. You can mount the rack directly to a wall or use wood boards for a more robust base.
  • Cost: $20-$40 (depending on pipe size)

Floating Wine Rack

  • Materials: Wooden dowels, brackets, screws, wood stain or paint (optional)
  • Construction: Attach brackets to the wall and insert wooden dowels to create slots for bottles. For a more substantial look, you can add wood boards behind the dowels. Finish with stain or paint for a customized look.
  • Cost: $15-$30 (depending on dowel size)

Acrylic Wine Display

  • Materials: Acrylic sheets, glue, wood (optional)
  • Construction: Cut the acrylic sheets to form a rectangular frame. Use glue to connect the sheets. You can add a wooden base for support or mount the acrylic rack directly to the wall.
  • Cost: $20-$50 (depending on acrylic thickness)

Tips for a Professional Look

To elevate your DIY wine rack from ordinary to extraordinary, follow these tips:

  • Choose high-quality materials: Invest in good wood, metal, or acrylic to ensure durability and a refined appearance.
  • Sanding and finishing: Take the time to sand your wood surfaces smooth and apply a high-quality finish, such as stain, paint, or varnish.
  • Hardware and fixtures: Use sturdy brackets, screws, and hinges for a secure and polished look.
  • Customization: Add personal touches like decorative accents, carved details, or metal accents to create a unique and stylish wine rack.
  • Lighting: Highlight your wine collection with strategically placed spotlights or LED strips for an added touch of elegance.

Conclusion

Creating a simple, inexpensive wine rack that looks expensive is a rewarding DIY project. By choosing the right materials, following easy construction steps, and adding finishing touches, you can craft a beautiful and functional piece that enhances your home's decor and showcases your wine collection with pride. Remember, the most expensive-looking wine racks are those that reflect your unique style and personal touch.

Read More..

Easy DIY Wood Gifts That Are Perfect for Selling

Easy DIY Wood Gifts That Are Perfect for Selling

Easy DIY Wood Gifts That Are Perfect for Selling

Are you looking for a creative and profitable way to make some extra cash? Consider crafting easy DIY wood gifts that are sure to delight customers. Woodworking offers a wide range of possibilities, from simple to elaborate, allowing you to cater to various tastes and budgets. With a little bit of effort and the right tools, you can transform ordinary wood into beautiful and functional pieces that people will cherish for years to come.

The Benefits of Selling DIY Wood Gifts

Selling DIY wood gifts comes with several advantages. First, you can tap into a growing market of individuals seeking unique and personalized gifts. Second, you have complete control over the design, materials, and quality of your products, allowing you to create items that truly reflect your artistic vision. Third, woodworking is a rewarding hobby that can be both therapeutic and profitable. And lastly, the materials and tools needed for basic woodworking projects are relatively inexpensive, making it an accessible craft for beginners.

Easy DIY Wood Gift Ideas

Personalized Wooden Coasters

Start with a simple project like personalized wooden coasters. Choose a beautiful wood like cherry, maple, or walnut, and cut the wood into squares or circles. Use a laser engraver to add custom designs, names, or initials, creating unique coasters that customers will love. You can also personalize the coasters by adding decorative elements like inlays or epoxy resin.

Rustic Wooden Signs

Rustic wooden signs are another popular choice for DIY wood gifts. Use reclaimed wood or rough-cut lumber to create signs for various occasions, such as birthdays, weddings, or housewarming parties. Paint the signs with vibrant colors or leave them natural, adding a touch of rustic charm. Customize the signs with phrases, quotes, or decorative elements to make them truly unique.

Handmade Wooden Ornaments

Embrace the holiday spirit by crafting adorable wooden ornaments. Cut out shapes like stars, hearts, or snowflakes using a jigsaw or scroll saw. Decorate the ornaments with paint, glitter, or fabric scraps. You can also add embellishments like ribbons or buttons for a more personalized touch. These ornaments are perfect for adding a handmade charm to Christmas trees, wreaths, or gift packages.

Wooden Cutting Boards

Practical and aesthetically pleasing, wooden cutting boards make excellent gifts. Select a durable wood like maple or walnut and cut it to the desired size and shape. Sand the board thoroughly and finish it with food-safe oil to protect it from moisture and bacteria. You can add a personal touch by engraving the board with a name, date, or special message.

Wooden Serving Trays

Create functional and beautiful wooden serving trays. Use plywood or a solid wood like oak to build the base. You can add decorative details like handles, grooves, or inlays. Sand the tray thoroughly and finish it with a clear coat to protect it from spills and scratches. Wooden serving trays are perfect for serving snacks, drinks, or appetizers at parties and gatherings.

Tips for Selling Your DIY Wood Gifts

To successfully sell your handmade wooden gifts, consider the following tips:

  • Create a strong online presence. Set up an Etsy shop, create a website, or use social media platforms like Instagram or Facebook to showcase your products and attract potential customers.
  • Take high-quality photos of your work. Professional-looking photos will entice customers and make your gifts stand out from the competition.
  • Offer personalized options. Allow customers to customize their gifts with initials, names, or special messages, adding a personal touch and increasing their value.
  • Provide excellent customer service. Respond promptly to inquiries, package your products carefully, and offer a hassle-free return policy to build trust and loyalty with your customers.
  • Promote your products at local craft fairs and markets. These events provide a great opportunity to interact with potential customers face-to-face and showcase your unique wood crafts.

With a little creativity, hard work, and the right marketing strategies, you can turn your passion for woodworking into a profitable business. Selling DIY wood gifts offers a rewarding way to share your talents, connect with customers, and generate income from your love of creating beautiful and functional pieces.

Read More..

Easy DIY Cold Frame from Scratch

Easy DIY Cold Frame from Scratch

Easy DIY Cold Frame from Scratch

A cold frame is a simple, yet invaluable tool for gardeners of all levels. It extends the growing season, allowing you to start seeds earlier in the spring, protect delicate plants during the winter, and even harden off seedlings before transplanting them into the garden. Building your own cold frame from scratch offers a sense of accomplishment, allows for customization to your needs, and can be a cost-effective solution.

Benefits of Using a Cold Frame

Cold frames provide a controlled environment that enhances plant growth and survival. They offer several benefits:

Extended Growing Season:

Cold frames trap solar heat, creating a microclimate warmer than the ambient air, allowing you to start seeds or transplant seedlings several weeks earlier in the spring.

Protection from Harsh Weather:

They shelter plants from frost, strong winds, and heavy rain, safeguarding delicate seedlings and extending the lifespan of your garden throughout the colder months.

Improved Seedling Success:

Cold frames offer a controlled environment for starting seeds. By providing consistent warmth and moisture, you can achieve a higher germination rate and healthier seedlings.

Hardening Off Seedlings:

Before transplanting seedlings outdoors, they need to adjust to the harsh conditions. A cold frame acts as a transitional environment, gradually acclimating them to direct sunlight and wind.

Cost-Effective Solution:

Building your own cold frame can be significantly less expensive than purchasing a pre-made one. This allows you to customize the size and design to your needs.

Materials Needed

You can build a simple cold frame using readily available materials. Here's a list of what you'll need:

  • Wood: 2x4s or 1x6s (for the frame and supports)
  • Plywood or polycarbonate sheeting: For the lid
  • Hinges: For attaching the lid to the frame
  • Screws or nails:
  • Paint or sealant: To protect the wood
  • Optional: Insulation, window glazing, and hardware cloth for ventilation

Steps for Building a Cold Frame

Follow these simple steps to construct your cold frame:

1. Determine the Size and Location:

The size of your cold frame will depend on your needs and available space. A standard size is 4 feet wide by 6 feet long, but you can adjust these dimensions to fit your garden. Choose a sunny location with good drainage. Ensure the site is level and free of obstructions.

2. Build the Frame:

Cut the wood to create the frame's perimeter. Use a saw and level to ensure precise cuts. Assemble the frame using screws or nails, ensuring the corners are square and secure. The frame can be rectangular, square, or even a more complex shape, depending on your preference.

3. Construct the Lid:

For a simple lid, cut a sheet of plywood or polycarbonate to match the size of the frame. Secure the lid material to a frame using screws or nails. If using polycarbonate, you may want to use a glazing tape to seal the edges.

4. Attach the Lid to the Frame:

Install hinges on one side of the lid and attach it to the frame. You can use either two or three hinges, depending on the size of the lid. Ensure the hinges allow for easy opening and closing.

5. Add Insulation and Ventilation (Optional):

For extra insulation, line the inside of the frame with foam board or bubble wrap. You can also create ventilation by adding hardware cloth to the bottom of the lid or by cutting a small vent in the lid. Ventilation helps regulate the temperature inside the cold frame.

6. Paint or Seal the Wood:

Apply paint or sealant to the wood frame and lid to protect them from moisture and the elements. Choose a weather-resistant paint or sealant that will last for years.

7. Position the Cold Frame:

Place the cold frame in its designated location. Ensure it's level and secure to prevent shifting or tipping over in strong winds.

8. Prepare the Growing Medium:

Fill the cold frame with a suitable growing medium, such as potting mix, compost, or a mixture of both. The medium should be loose and well-draining.

Tips for Using Your Cold Frame

Once your cold frame is built, follow these tips for optimal performance:

  • Monitor Temperature: Use a thermometer to monitor the temperature inside the cold frame. Ideal temperatures for seedlings range from 60 to 70 degrees Fahrenheit. Adjust the lid position to control the temperature.
  • Provide Adequate Ventilation: Open the lid during the day to allow fresh air circulation and prevent overheating. Close the lid at night to trap warmth and protect plants from frost.
  • Water Regularly: Keep the growing medium consistently moist, but avoid overwatering. Check the soil moisture daily and water as needed.
  • Protect from Pests and Diseases: Use row covers or netting to deter pests and diseases. Regular inspection can also help identify any issues early on.
  • Hardening Off Seedlings: Once seedlings have reached a suitable size, start hardening them off by gradually exposing them to outdoor conditions for increasing periods each day. This acclimates them to the harsh weather and prepares them for transplanting.

Conclusion

Building your own cold frame from scratch is a rewarding project that can significantly benefit your gardening endeavors. With a little time and effort, you can create a durable, customizable structure that will extend your growing season, improve seedling success, and enhance your overall gardening experience.

Read More..

Build a Cold Frame: DIY Guide and PDF

Build a Cold Frame: DIY Guide and PDF

Build a Cold Frame: DIY Guide and PDF

A cold frame is a simple, yet highly effective structure that extends your gardening season by providing a protected and controlled environment for plants. It acts as a mini-greenhouse, trapping solar heat and shielding your plants from harsh weather conditions. Building your own cold frame offers numerous advantages, including cost savings, customized design options, and the satisfaction of creating something yourself.

This comprehensive guide will walk you through the steps of building a cold frame, complete with detailed instructions, material lists, and a downloadable PDF for your convenience.

Choosing the Right Location

The location of your cold frame is crucial for its success. Consider the following factors when selecting a spot:

Sunlight

Cold frames require ample sunlight, ideally a south-facing location that receives at least 6 hours of direct sunlight daily. Avoid shady areas or locations blocked by trees or buildings.

Drainage

Proper drainage is essential to prevent waterlogging and root rot. Choose a site with well-drained soil or create a raised bed for better drainage.

Accessibility

Ensure easy access to your cold frame for planting, tending, and harvesting. Position it near a water source and a path for convenient movement.

Materials and Tools

Before you begin, gather the necessary materials and tools. You can customize the design and materials based on your preferences and budget. Here's a suggested list:

Materials

  • Framing Material: Cedar, redwood, pressure-treated lumber, or recycled pallets (check for chemical treatments)
  • Glazing: Clear polycarbonate panels, glass panes, or recycled windows
  • Fasteners: Screws, nails, and brackets
  • Sealant: Silicone caulk or weather stripping
  • Soil: Potting mix or garden soil
  • Optional: Hinge for lid, latch for security, ventilation system

Tools

  • Saw (circular, jigsaw, or hand saw)
  • Drill
  • Screwdriver
  • Level
  • Measuring tape
  • Pencil
  • Safety glasses and gloves

Building the Cold Frame

Follow these step-by-step instructions to build your cold frame:

Step 1: Design and Cut the Framing

Determine the size of your cold frame based on the space available and your planting needs. Consider the dimensions of the glazing material you plan to use. Cut the framing material to the desired lengths using a saw, ensuring precise measurements.

Step 2: Assemble the Base

Join the framing pieces to form the base of the cold frame. Secure the joints using screws or nails, ensuring a sturdy and square construction. Use a level to ensure the base is flat and level.

Step 3: Construct the Sides and Back

Cut and attach the side and back panels to the base. Make sure the sides are vertical and aligned. You can use corner brackets for added strength and stability.

Step 4: Install the Lid

Build the lid using the same framing material. Attach it to the base using hinges for easy opening and closing. Consider incorporating a latch or a locking mechanism for security.

Step 5: Add the Glazing

Secure the glazing material to the frame using screws or brackets. Apply sealant around the edges to prevent leaks and ensure a tight seal. For glass, you may need to use glazing points for a professional look and secure hold.

Step 6: Finish and Prepare for Planting

Apply a finishing coat of paint or stain to protect the wood from weathering. Fill the cold frame with soil, making sure to choose a mix that suits the plants you will be growing.

Tips for Success

Here are some essential tips to maximize the effectiveness of your cold frame:

  • Ventilation: Provide adequate ventilation by opening the lid on sunny days or using vents for air circulation. This prevents overheating and promotes healthy plant growth.
  • Temperature Monitoring: Regularly check the temperature inside the cold frame, especially during extreme weather conditions. Use a thermometer to maintain an optimal temperature range for your plants.
  • Watering: Water plants as needed, ensuring the soil is adequately moist but not waterlogged. Overwatering can lead to root problems.
  • Hardening Off: Gradually acclimate your plants to outdoor conditions before transplanting them permanently. This prevents shock and improves their survival rate.
  • Winter Protection: Add extra insulation to your cold frame during winter by covering the glazing with blankets or bubble wrap to retain heat.

Benefits of a Cold Frame

Building a cold frame offers several benefits to gardeners:

  • Extended Growing Season: Start seeds earlier in the spring and extend the harvest into the fall.
  • Protection from Harsh Weather: Shield your plants from frost, wind, and heavy rain.
  • Improved Plant Growth: Create a controlled environment with warmer temperatures and increased humidity.
  • Cost-Effective Solution: Build a cold frame for a fraction of the cost of a greenhouse.
  • Environmental Benefits: Reduce water usage and promote sustainable gardening practices.

Downloadable PDF Guide

For your convenience, we've created a downloadable PDF version of this guide, containing all the instructions, materials list, and tips for building your cold frame. Click the link below to access the PDF:

[Insert Link to PDF Download]

Conclusion

Building a cold frame is a rewarding project that empowers you to extend your gardening season and grow healthier, more productive plants. By following these detailed instructions, you can create a customized structure that meets your specific needs and budget. With careful planning and construction, your cold frame will become a valuable addition to your garden, enhancing your gardening experience for years to come.

Read More..