Simple Compost Bin Projects You Can Build Today

Simple Compost Bin Projects You Can Build Today

Simple Compost Bin Projects You Can Build Today

Composting is a fantastic way to reduce waste, enrich your garden soil, and contribute to a more sustainable lifestyle. Building your own compost bin allows you to customize it to your needs and provides a rewarding DIY project. Here are some simple compost bin projects you can build today, using readily available materials:

Pallet Compost Bin

Pallet compost bins are a popular choice for their affordability and ease of construction. You can find pallets for free or at a low cost from local businesses.

Materials

  • Two wooden pallets
  • Screws or nails
  • Power drill or hammer
  • Optional: Wire mesh or hardware cloth for ventilation

Instructions

  1. Prepare the pallets: Remove any loose nails or staples and sand down any rough edges. You may want to clean the pallets with a pressure washer for a more aesthetically pleasing look.
  2. Assemble the bin: Place the pallets parallel to each other, leaving a gap of about 12 inches between them for air circulation. Secure the pallets together with screws or nails.
  3. Add ventilation: If desired, attach wire mesh or hardware cloth to the sides of the bin to enhance airflow.
  4. Optional: Create a lid for the bin using a third pallet or plywood.

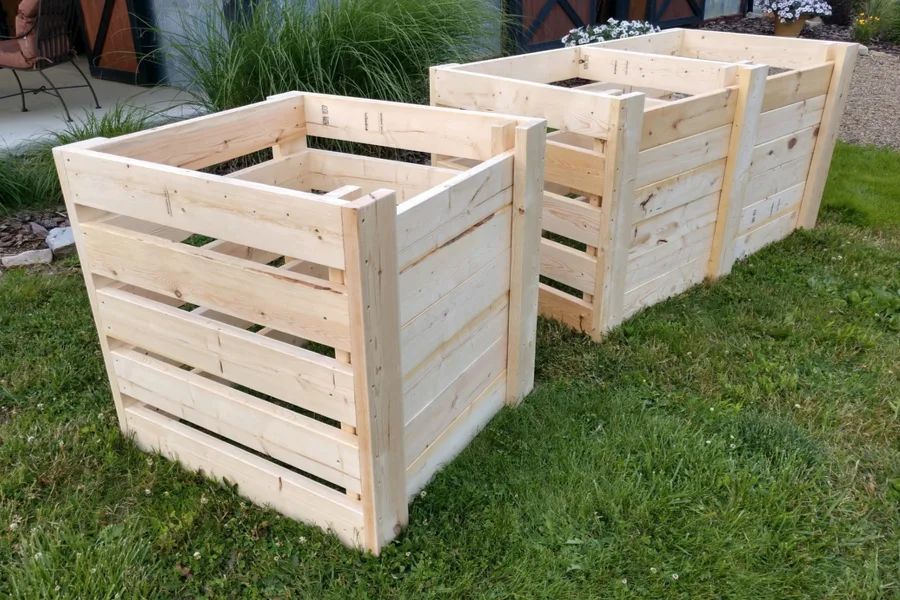
Three-Bin Compost System

A three-bin compost system offers a convenient way to manage different stages of composting. You can have one bin for fresh scraps, one for active composting, and one for finished compost.

Materials

  • Six wooden planks (8 feet long)
  • Four wooden posts (4 feet long)
  • Screws or nails
  • Power drill or hammer
  • Optional: Wire mesh or hardware cloth for ventilation

Instructions

  1. Build the frames: Use the wooden planks to create three rectangular frames, each about 3 feet wide and 3 feet long. Secure the corners with screws or nails.
  2. Attach the posts: Attach the wooden posts to the corners of each frame, using screws or nails. Ensure the posts are spaced to create three compartments.
  3. Optional: Add ventilation to each bin by attaching wire mesh or hardware cloth to the sides.
  4. Finishing touches: You can add a decorative element like a trellis or a raised edge.

Tumbling Compost Bin

Tumbling compost bins are ideal for producing compost quickly because they provide constant aeration. They are also relatively small and can be easily moved around your garden.

Materials

  • Two 55-gallon drums
  • Hinge hardware
  • Screws or nails
  • Power drill or hammer
  • Optional: Metal handles for easy turning

Instructions

  1. Prepare the drums: Clean the drums thoroughly and remove any labels. Drill several drainage holes in the bottom of each drum. Drill a few ventilation holes in the sides of each drum.
  2. Attach the hinges: Attach the hinges to the top of one drum and the bottom of the other drum.
  3. Secure the drums: Attach the two drums together using screws or nails, ensuring they are securely hinged.
  4. Add handles: If desired, attach handles to the side of the drum for easier turning.

DIY Compost Bin Tips

Here are some tips to ensure successful composting:

  • Location: Choose a location that is shaded, well-drained, and easily accessible. A slight slope can aid with drainage.
  • Brown to Green Ratio: Maintain a balanced ratio of "brown" materials (carbon-rich, like leaves and twigs) to "green" materials (nitrogen-rich, like kitchen scraps and grass clippings). A general rule of thumb is a 2:1 ratio of brown to green.
  • Moisture: The compost should be moist, but not soggy. Add water as needed, especially during dry weather.
  • Turning: Turn the compost regularly to ensure adequate aeration and breakdown.
  • Patience: Composting takes time. It can take anywhere from several weeks to several months for compost to break down fully.

Additional Considerations for Building Your Compost Bin

Beyond the simple design, consider these factors for your compost bin project:

  • Aesthetics: If you want a more visually appealing compost bin, consider using treated lumber or painting the wood.
  • Size: Determine the size of your compost bin based on your needs and the amount of material you plan to compost.
  • Accessibility: Make sure the bin is easy to access for adding materials and turning the compost.

Building your own compost bin is a fun and rewarding project. You'll not only save money on purchasing a pre-made compost bin but also get to enjoy the satisfaction of knowing that you're creating something useful for your garden. With a little effort and creativity, you can create a simple compost bin that meets your needs and adds a touch of eco-friendly charm to your backyard.

Read More..

Step-by-Step Plans to Build a Squirrel Den Box

Step-by-Step Plans to Build a Squirrel Den Box

Build a Cozy Squirrel Den Box

Are you looking for a fun and rewarding DIY project that will bring joy to your backyard? Building a squirrel den box is a great way to provide shelter for these adorable creatures and observe their fascinating habits up close. With a few simple materials and some basic carpentry skills, you can create a welcoming home for your local squirrel population.

Gather Your Materials

Before you start building, ensure you have all the necessary materials. Here’s what you’ll need:

  • Wood: Choose a durable and weather-resistant wood like cedar, redwood, or pressure-treated pine. You will need 1 x 6 boards for the sides and roof, a 1 x 4 board for the base, and a 1 x 2 board for the trim.
  • Screws: Use 1 1/2-inch or 2-inch wood screws for assembling the box.
  • Saw: A circular saw or a handsaw will help you cut the wood to size.
  • Drill: A drill with a drill bit that matches your screws will make it easier to assemble the box.
  • Measuring tape: Accurate measurements are crucial for creating a well-fitting box.
  • Level: Ensure the box is level for stability.
  • Hammer: You may need a hammer to help with certain steps.
  • Safety Glasses: Always wear safety glasses when working with wood and power tools.

Constructing the Squirrel Den Box

Now that you have gathered your materials, it’s time to build the squirrel den box! Follow these detailed steps:

Cutting the Wood

Start by cutting the wood according to the following dimensions:

  • Sides: Two pieces of 1 x 6 board, 12 inches long each.
  • Back: One piece of 1 x 6 board, 12 inches long.
  • Front: One piece of 1 x 6 board, 12 inches long.
  • Roof: Two pieces of 1 x 6 board, 14 inches long each.
  • Base: One piece of 1 x 4 board, 12 inches long.
  • Trim: Two pieces of 1 x 2 board, 12 inches long each.

It's recommended to add a 1/4-inch overhang to the roof boards to prevent water from dripping inside the box. To achieve this, cut the roof boards 1/4 inch longer than the box width (14 inches) to create the overhang.

Assembling the Box

Now it’s time to assemble the squirrel den box. Follow these steps:

  1. Assemble the Base: Attach the two side boards to the base board using screws. Ensure the side boards are flush with the base board and that the base is level.
  2. Attach the Back: Attach the back board to the sides, ensuring it’s flush with the base and the sides.
  3. Attach the Front: Attach the front board to the sides, ensuring it’s flush with the base and the sides.
  4. Attach the Roof: Place the roof boards on top of the box, with the overhang extending past the sides. Attach the roof boards to the sides using screws. You might need to use a level to ensure the roof is straight and secure.
  5. Add Trim: Attach the trim pieces to the front and back of the box, concealing the rough edges of the wood and creating a more finished look. This step is optional, but it enhances the box's appearance and durability.

Adding a Entrance Hole

The next step is to add an entrance hole to your squirrel den box. Use a drill or saw to cut a 3-inch diameter hole near the center of the front board. This will be the entrance point for the squirrels.

Finishing Touches

To add some extra protection and enhance the lifespan of the squirrel den box, consider these final steps:

  • Paint or Stain: Paint the outside of the box with a weather-resistant paint or stain to protect the wood and prevent moisture damage.
  • Ventilation: Drill a few small ventilation holes on the sides of the box to allow for proper air circulation inside.
  • Optional Roof Shingles: For added weather protection, you can attach a few layers of asphalt shingles to the roof using construction adhesive and nails.

Installing the Squirrel Den Box

Choose a suitable location for your squirrel den box. It’s best to place it in a sheltered area with a bit of overhead cover for shade and protection from the elements. You can mount it on a sturdy tree branch or attach it to a fence post with strong brackets.

It's important to secure the box to its chosen location to ensure it remains stable and safe for the squirrels. Don't forget to keep the box at a height that allows for easy access for the squirrels, and place it close enough to branches or trees for them to easily navigate and access the box.

Enjoy Watching Your New Backyard Guests

Congratulations! You have now successfully built a cozy squirrel den box that will provide a safe and comfortable home for the squirrels in your area. Once you have installed the box, keep an eye out for your new backyard guests. You might be lucky enough to witness the squirrels exploring their new home, building nests, and enjoying the cozy shelter you have provided.

Building a squirrel den box is a rewarding and enjoyable project for anyone who enjoys spending time outdoors. It's a great way to connect with nature and contribute to the well-being of your local wildlife.

Read More..

Build a Custom Bedside Cabinet with These Free PDF Plans

Build a Custom Bedside Cabinet with These Free PDF Plans

Build a Custom Bedside Cabinet with These Free PDF Plans

Elevate your bedroom's ambiance and functionality with a handcrafted bedside cabinet. These free PDF plans provide a comprehensive guide to constructing a stylish and practical piece of furniture that seamlessly integrates with your existing décor.

Design Considerations

Before embarking on the construction process, carefully consider the following design elements to ensure a cohesive and functional bedside cabinet:

Style

Choose a style that complements your bedroom's aesthetic. Options include:

  • Modern: Clean lines, minimalist design, and sleek materials.
  • Traditional: Ornate details, intricate carvings, and classic wood finishes.
  • Rustic: Unfinished or distressed wood, salvaged materials, and a rugged appeal.

Size

Measure the available space beside your bed and determine the ideal dimensions for your cabinet. Consider the following factors:

  • Width: Ensure sufficient space for a nightstand lamp, books, and other essentials.
  • Height: Select a height that allows for comfortable access to the top surface.
  • Depth: Choose a depth that provides adequate storage without overwhelming the space.

Materials

The choice of materials will significantly impact the cabinet's appearance and durability:

  • Wood: Popular options include oak, maple, cherry, and pine. Each wood species offers unique grain patterns and durability.
  • Metal: Metal accents, such as handles, hinges, and legs, can add a modern or industrial touch.
  • Glass: Glass shelves or doors create a sense of openness and allow for showcasing decorative items.

Required Tools and Materials

To bring your bedside cabinet to life, gather the necessary tools and materials. These may vary depending on the specific design and complexity of the project. Common tools include:

  • Saw: For cutting wood to size. A table saw or circular saw is recommended.
  • Drill: For creating holes for screws, hinges, and drawer slides.
  • Screwdriver: For assembling the cabinet.
  • Sandpaper: For smoothing out rough edges and preparing the wood for finishing.
  • Clamps: For securing pieces of wood during assembly.
  • Measuring tape: For ensuring accurate dimensions.
  • Level: For ensuring the cabinet is plumb and straight.

Materials typically include:

  • Wood planks of various dimensions based on the design.
  • Screws for assembling the frame and attaching hardware.
  • Wood glue for reinforcing joints.
  • Drawer slides, if applicable.
  • Hinges for doors, if applicable.
  • Handles, knobs, or pulls.
  • Wood finish (stain, paint, or sealant) for protecting and enhancing the wood.

Steps for Building the Bedside Cabinet

The free PDF plans will provide detailed instructions and diagrams to guide you through each step of the construction process. However, here's a general overview of the typical steps involved:

Cutting the Wood

Begin by carefully cutting the wood planks according to the dimensions specified in the plans. Use a saw, such as a table saw or circular saw, to achieve precise cuts.

Assembling the Frame

Assemble the cabinet's frame by joining the cut wood pieces together. Use wood glue and screws to secure the joints, ensuring they are strong and durable.

Adding Shelves and Drawers

If your design includes shelves or drawers, install them within the cabinet frame. Use drawer slides for smooth-operating drawers and secure shelves with screws.

Attaching Doors or Panels

If your cabinet features doors or panels, attach them to the frame using hinges. Ensure the doors open and close smoothly and securely.

Installing Hardware

Install any necessary hardware, such as handles, knobs, and pulls. Make sure they are securely attached and aesthetically pleasing.

Finishing the Cabinet

Apply a wood finish, such as stain, paint, or sealant, to protect the wood and enhance its appearance. Allow the finish to dry completely before handling the cabinet.

Customization and Personalization

Once the basic construction is complete, personalize your bedside cabinet to reflect your individual style and preferences. Consider adding the following elements:

  • Embellishments: Include decorative accents, such as moldings, trim, or carving, to enhance the cabinet's aesthetics.
  • Lighting: Incorporate built-in lighting, such as a small LED strip, for added functionality and ambiance.
  • Storage Solutions: Add specialized storage compartments or organizers for specific items, such as jewelry or makeup.

Conclusion

Building a custom bedside cabinet from free PDF plans empowers you to create a unique piece of furniture that perfectly complements your bedroom's décor. By following the detailed instructions and diagrams, you can transform your woodworking skills into a stylish and functional addition to your home.

Read More..

Creative Uses for a DIY Bedside Cabinet in Your Home

Creative Uses for a DIY Bedside Cabinet in Your Home

Creative Uses for a DIY Bedside Cabinet in Your Home

In the realm of interior design, versatility reigns supreme. While traditional bedside cabinets serve their purpose admirably, the DIY spirit encourages exploration beyond the ordinary. A well-crafted, personalized bedside cabinet can transform into a multifaceted piece of furniture, seamlessly blending functionality with aesthetics.

This exploration delves into the creative uses of a DIY bedside cabinet, showcasing its potential beyond its intended purpose. From practical storage solutions to captivating decorative accents, a homemade bedside cabinet can become an indispensable element in various areas of your home.

Unleashing the Potential: Beyond the Bedroom

The beauty of a DIY bedside cabinet lies in its adaptability. The same principles that guide its construction in the bedroom can be applied to other spaces, infusing them with a unique charm. Let us explore some unconventional uses:

A Corner Apothecary

Transform a bedside cabinet into a captivating apothecary corner in your bathroom. The cabinet's drawers can house essential oils, bath salts, and beauty products, while the top surface provides a stylish platform for displaying decorative elements. Embellish the cabinet with vintage jars and labels to enhance the apothecary aesthetic, creating a spa-like ambiance in your bathroom.

A Mini-Library in Your Living Room

Create a cozy reading nook by repurposing a bedside cabinet as a mini-library. The drawers can accommodate favorite novels, while the top surface can showcase a cherished collection of books. Adding a small reading lamp and a comfortable chair completes the picture, transforming your living room into a literary haven.

A Functional Kitchen Island

In a small kitchen, a DIY bedside cabinet can be repurposed as a functional kitchen island. The drawers offer ample storage for utensils, cookware, or pantry items. The top surface provides additional counter space for meal preparation or serving. A small bar stool can be placed beside the cabinet to create a breakfast nook, enhancing the kitchen's utility and aesthetic appeal.

A Decorative Entryway Console

Welcome guests with an inviting entryway by repurposing a bedside cabinet as a console. The cabinet's drawers can store keys, mail, or other essentials, while the top surface can showcase a decorative vase, a framed photo, or a small mirror. Choose a cabinet with an elegant design to elevate the entryway's visual appeal.

Elevating the Bedroom Experience

While the potential applications of a DIY bedside cabinet extend beyond the bedroom, its core functionality remains central to this space. Explore creative ways to enhance its utility and aesthetic appeal within your sleep sanctuary.

A Personalized Nightstand

Start with the basics: a personalized nightstand. Customize the cabinet's finish, paint it a bold color, or adorn it with decorative hardware to match your bedroom's decor. The drawers can house books, reading glasses, and other bedside essentials, while the top surface can display a cherished photo frame, a small lamp, or a fragrant candle.

A Multimedia Hub

In the digital age, a bedside cabinet can transform into a multimedia hub. Incorporate a power outlet within the cabinet's structure to conveniently charge your phone, tablet, or e-reader. The top surface can accommodate a small speaker, a tablet stand, or a charging dock for seamless access to entertainment.

A Cozy Reading Corner

Create a cozy reading corner within your bedroom by repurposing a bedside cabinet. The cabinet's drawers can hold books, magazines, or notepads, while the top surface can accommodate a comfortable reading pillow or a small, adjustable lamp. Adding a soft blanket completes the picture, transforming your bedroom into a tranquil reading haven.

A Stylish Makeup Vanity

For those who enjoy a meticulous beauty routine, a DIY bedside cabinet can be repurposed as a stylish makeup vanity. The cabinet's drawers can house makeup brushes, cosmetics, and skincare products. The top surface can accommodate a small mirror, a makeup organizer, and a few decorative elements to personalize the space.

Embracing the DIY Spirit: Unleashing Creativity

The beauty of a DIY bedside cabinet lies in its ability to reflect your personal style and creativity. Embrace the process and let your imagination run wild:

Materials and Techniques

From reclaimed wood to vintage furniture, the materials used in crafting your bedside cabinet can significantly impact its aesthetic and functionality. Explore various woodworking techniques, including staining, painting, distressing, and decoupage, to achieve the desired look.

Unique Design Elements

Don't be afraid to incorporate unique design elements that reflect your personality. Consider adding a decorative molding, a custom-made handle, or a personalized inscription. Experiment with different finishes, such as metal accents, glass inserts, or antique hardware, to create a truly one-of-a-kind piece.

Personalized Touches

Add personalized touches to your DIY bedside cabinet to enhance its charm and sentimental value. Include a family photo, a treasured memento, or a handwritten inscription to make it a cherished keepsake. These details will create a sense of warmth and individuality in your home.

Beyond the Basics: Maximizing Functionality

A DIY bedside cabinet can be more than just a storage solution. Explore ways to maximize its functionality and enhance its utility in your home:

Built-in Lighting

Incorporate built-in lighting within the cabinet's structure to illuminate the surrounding area. A small LED strip or a discreet lamp can add a touch of ambiance to your bedroom or other spaces.

Integrated Outlets

For a touch of modern convenience, consider integrating electrical outlets within the cabinet's structure. This will allow you to easily charge devices, use small appliances, or illuminate the space without cluttering your countertop.

Hidden Storage Solutions

Maximize the storage capacity of your DIY bedside cabinet by incorporating hidden compartments or secret drawers. These can be used to discreetly store valuables, personal items, or any objects that require additional security.

Movable Wheels

Add a touch of versatility by attaching casters or wheels to the bottom of your DIY bedside cabinet. This will allow you to easily move the cabinet around the room, rearranging your furniture or relocating it to different spaces as needed.

In conclusion, a DIY bedside cabinet is a testament to the boundless creativity and ingenuity of homeowners. By embracing the spirit of customization, you can transform this humble piece of furniture into a multi-faceted element, enhancing the functionality and aesthetics of various spaces in your home. Whether you're seeking a practical storage solution, a decorative accent, or a personalized keepsake, a DIY bedside cabinet offers endless possibilities, allowing you to create a home that truly reflects your unique style and personality.

Read More..

Modern DIY Bedside Cabinet Designs You Can Build at Home

Modern DIY Bedside Cabinet Designs You Can Build at Home

Modern DIY Bedside Cabinet Designs You Can Build at Home

Elevate your bedroom's aesthetic and functionality with custom-built bedside cabinets. These handy companions provide a space for your essentials while adding a touch of personal flair to your sanctuary. This comprehensive guide will explore modern DIY bedside cabinet designs, equipping you with the knowledge and inspiration to build your own stunning creations.

Planning Your Bedside Cabinet

Before embarking on your DIY journey, it's crucial to have a clear vision for your bedside cabinet. Consider the following aspects:

Style and Aesthetics

  • Modern Minimalism: Sleek lines, clean surfaces, and a focus on functionality. Consider using materials like wood, metal, or acrylic.
  • Industrial Chic: Raw materials like reclaimed wood, exposed metal accents, and a rugged aesthetic.
  • Mid-Century Modern: Curved edges, tapered legs, and a mix of natural wood and bold colors.
  • Rustic Charm: Warm wood tones, distressed finishes, and natural textures.
  • Size and Dimensions

    Measure the space available next to your bed and determine the optimal size for your bedside cabinet. Consider the height, width, and depth that best suit your needs.

    Storage Requirements

    Decide what you plan to store in your bedside cabinet. A drawer for smaller items, shelves for books, or a combination of both? The number and configuration of shelves and drawers will impact the overall design.

    Materials and Finishes

  • Wood: Versatile and widely available, from pine and oak to walnut and cherry.
  • Metal: Adds a modern or industrial touch. Consider steel, aluminum, or brass.
  • Acrylic: Provides a sleek, contemporary look.
  • Finishes: Stain, paint, or lacquer to achieve the desired look and protect the material.
  • Essential Tools and Materials

    Here's a list of tools and materials you'll likely need for your DIY bedside cabinet project:

    Tools

  • Saw (circular, jigsaw, or table saw)
  • Drill
  • Screwdriver
  • Measuring tape
  • Level
  • Clamps
  • Sandpaper
  • Safety glasses
  • Dust mask
  • Gloves
  • Materials

  • Wood (lumber, plywood, or MDF)
  • Hardware (hinges, drawer slides, knobs, pulls)
  • Screws
  • Glue
  • Paint or stain
  • Finish (varnish, lacquer, or wax)
  • Modern Bedside Cabinet Designs

    Let's delve into some inspiring modern bedside cabinet designs you can build at home.

    Floating Bedside Cabinet

    This minimalist design creates a sense of spaciousness and airiness. The cabinet appears to float on the wall, eliminating the need for bulky legs. Use a sturdy piece of plywood or MDF for the base and attach it securely to the wall. Add a single drawer or a shelf for storage. Finish with a clean, minimalist stain or paint.

    Geometric Bedside Cabinet

    Embrace geometric shapes for a bold, contemporary design. Consider a rectangular cabinet with angled edges or a triangular shape. Use contrasting wood species or paint to create visual interest. Geometric accents, such as metal drawer pulls, enhance the modern feel.

    Open Shelving Bedside Cabinet

    This design offers a streamlined aesthetic and easy access to your essentials. Use a combination of shelves and a single drawer to create a balanced look. Opt for materials like wood, metal, or acrylic to match your bedroom's style. Consider adding LED strip lights beneath the shelves for a modern touch.

    Bedside Cabinet with a Built-in Reading Lamp

    Combine functionality and style with a built-in reading lamp. Integrate a small, adjustable lamp into the side of the cabinet. Choose a minimalist lamp design to complement the overall style. Use a dimmer switch for adjustable lighting.

    Bedside Cabinet with a Hidden Compartment

    Create a secret storage space within your bedside cabinet. Use a hidden compartment for valuable items or to add a unique design element. Consider a drawer with a false bottom or a hidden shelf behind a panel.

    Construction Steps

    Once you've chosen your design and gathered your materials, follow these general construction steps:

    Cutting and Assembly

  • Cut the wood pieces to your desired dimensions using a saw.
  • Join the pieces together using glue, screws, or both.
  • Use clamps to secure the joints while the glue dries.
  • Finishing

  • Sand the cabinet smooth with sandpaper.
  • Apply a stain or paint to achieve the desired color and finish.
  • Seal the finish with varnish, lacquer, or wax for protection.
  • Installing Hardware

  • Attach drawer slides to the cabinet and drawers.
  • Install hinges on the cabinet doors.
  • Mount the cabinet on the wall or install legs.
  • Add knobs or pulls to the drawers and doors.
  • Tips for Success

  • Plan Ahead: Carefully measure and create a detailed construction plan.
  • Use Quality Materials: Invest in durable wood or other materials for a long-lasting cabinet.
  • Pay Attention to Detail: Take your time, ensure accurate cuts and even finishes.
  • Safety First: Wear safety glasses, a dust mask, and gloves when working with tools.
  • Finish with Flair: Choose a stain, paint, or other finish that complements your bedroom décor.
  • Conclusion

    Building your own modern bedside cabinet is a rewarding project that allows you to create a piece of furniture that reflects your unique style and complements your bedroom's aesthetic. With a little planning, patience, and creativity, you can create a custom bedside cabinet that serves as a practical storage solution and a stylish focal point. Remember, it's your design, so don't be afraid to experiment and make it your own!

    Read More..

    How to make a grill gazebo with sliding doors for extra protection

    How to make a grill gazebo with sliding doors for extra protection

    Constructing a Grill Gazebo with Sliding Doors for Enhanced Protection

    A grill gazebo provides a comfortable and protected space for outdoor cooking and entertaining. Incorporating sliding doors into the design offers an additional layer of security, privacy, and weather protection. This comprehensive guide will walk you through the process of building a grill gazebo with sliding doors, ensuring a safe and enjoyable grilling experience.

    Planning and Design Considerations

    Determine the Location and Size

    Choose a suitable location for your gazebo, taking into account proximity to the grill, existing structures, and desired views. Consider the dimensions of your grill and the amount of space you need for comfortable movement and storage. Measure the area carefully and create a detailed plan to ensure the gazebo fits seamlessly within the landscape.

    Material Selection

    Select durable and weather-resistant materials for the gazebo structure and roof. Common options include:

    • Aluminum: Lightweight, rust-resistant, and relatively inexpensive.
    • Steel: Strong and durable, but susceptible to rust without proper treatment.
    • Wood: Adds warmth and natural aesthetics but requires regular maintenance.
    • Vinyl: Low-maintenance, water-resistant, and available in a range of colors.

    For the roof, consider options like:

    • Polycarbonate: Durable, clear, and offers excellent UV protection.
    • Metal: Lightweight and offers good weather resistance.
    • Canvas: Provides shade and ventilation but may require regular cleaning.

    Design Features

    Consider these design features for enhanced functionality and aesthetics:

    • Sliding Doors: Choose a sliding door mechanism that is easy to operate and provides a smooth, secure seal.
    • Ventilation: Incorporate vents or windows to allow for air circulation and prevent overheating.
    • Storage: Include shelves or drawers for grilling tools, utensils, and other accessories.
    • Lighting: Install LED lights for nighttime grilling and entertaining.

    Construction Process

    Foundation and Framing

    1. Prepare the site by leveling the ground and marking the dimensions of the gazebo. 2. Install concrete piers or wooden posts to support the frame, ensuring they are plumb and level. 3. Build the frame using pre-cut lumber or metal components according to the plan. 4. Secure the frame to the piers or posts using bolts or brackets.

    Roof Installation

    1. Attach the roof rafters to the frame, ensuring they are properly spaced and aligned. 2. Install the roof sheathing, using plywood or other suitable material. 3. Apply roofing felt or underlayment for waterproofing. 4. Secure the chosen roofing material (polycarbonate, metal, or canvas) to the sheathing using screws or nails.

    Sliding Door Installation

    1. Determine the door openings and mark the frame accordingly. 2. Install the door tracks and rollers according to the manufacturer's instructions. 3. Cut and assemble the door panels using the chosen material. 4. Attach the door panels to the rollers and ensure they slide smoothly along the tracks. 5. Install door hardware (handles, locks) for security and easy operation.

    Finishing Touches

    1. Apply a sealant or paint to protect the frame and roof from the elements. 2. Install siding or trim for aesthetic appeal and added protection. 3. Attach any additional features like shelves, storage compartments, or lighting. 4. Clean and decorate the gazebo to create a welcoming and inviting space.

    Safety Considerations

    1. Fire Safety: Keep a fire extinguisher readily available and be aware of potential fire hazards. Ensure proper ventilation to prevent the accumulation of smoke and heat. 2. Electrical Safety: Install electrical outlets with GFCI protection and use appropriate extension cords. 3. Structural Stability: Regularly check the frame and roof for any signs of damage or weakness. Secure the gazebo to the ground during windy conditions. 4. Weather Protection: Close the sliding doors and secure the gazebo during heavy rain or strong winds. 5. Children and Pets: Supervise children and pets near the gazebo and keep them away from hot surfaces and potentially hazardous areas. 6. First Aid: Keep a well-stocked first aid kit accessible for any injuries.

    Conclusion

    Building a grill gazebo with sliding doors requires careful planning, attention to detail, and a focus on safety. By following the steps outlined in this guide, you can create a functional and aesthetically pleasing outdoor space that enhances your grilling experience. Remember to prioritize safety measures and maintain the gazebo regularly to ensure its longevity and enjoyment for years to come.

    Read More..

    Guide to crafting a multi-functional wood desk with storage

    Guide to crafting a multi-functional wood desk with storage

    Building Your Dream Multi-Functional Wood Desk: A DIY Guide

    Hey there, woodworking enthusiasts and aspiring furniture makers! Are you tired of cramped desks and cluttered workspaces? Craving a piece of furniture that not only looks sleek but also caters to all your organizational needs? Then you've come to the right place! We're diving headfirst into the world of multi-functional wood desks with built-in storage, a project that's both rewarding and practical. This guide will walk you through every step, from planning to finishing, ensuring you end up with a piece that's as unique as you are.

    Planning Your Multi-Functional Masterpiece:

    Before you start swinging that hammer, it's crucial to plan your desk meticulously. This involves deciding on the following:

    1. Size and Shape:

    First things first: what size desk fits your space and needs? Consider your workspace, the type of tasks you'll be doing (e.g., writing, drawing, crafting), and the amount of storage you require. Do you want a large, L-shaped desk for a home office setup or a compact desk for a smaller room? Think about the overall shape - rectangular, oval, or even a unique custom design!

    2. Materials:

    Wood is the star of the show here, but the options are plentiful! Pine, oak, maple, and walnut are popular choices, each with its own grain patterns and durability. Consider the type of wood's color, hardness, and price to find the perfect fit for your project. Plywood is another great option, offering stability and affordability. For added strength and durability, consider using a combination of different woods for different parts of the desk.

    3. Storage Features:

    This is where your creativity really shines! Do you need drawers for files and stationery, shelves for books and electronics, or a combination of both? Maybe you want a built-in keyboard tray, a hidden cable management system, or a pull-out monitor stand. The options are practically limitless!

    4. Style:

    What vibe are you going for? A rustic farmhouse look? A sleek and modern feel? A classic minimalist aesthetic? The style of your desk will influence your choice of wood, finishes, and hardware. This is also where you can personalize your project - think about unique details like decorative carving, metal accents, or even a fun paint job.

    5. Budget:

    Be realistic about your budget, considering the cost of materials, tools, and any custom hardware. Don't be afraid to adjust your plans if necessary to stay within your budget - remember, DIY projects are all about getting creative and finding solutions!

    Gathering Your Tools and Materials:

    Now that you have a solid plan, it's time to gather your tools and materials. Here's a comprehensive list to get you started:

    Tools:

  • Circular Saw
  • Jig Saw
  • Router
  • Sanding Block or Sander
  • Drill/Driver
  • Screwdriver
  • Clamps
  • Measuring Tape
  • Pencil
  • Level
  • Safety Glasses
  • Dust Mask
  • Work Gloves
  • Materials:

  • Wood (planks or sheets, depending on your design)
  • Wood Glue
  • Screws (different sizes for various applications)
  • Wood Finish (stain, paint, or sealant)
  • Hardware (hinges, drawer slides, knobs, pulls)
  • Finishing Supplies (brushes, rags, sandpaper)
  • Note: This is a basic list, and your specific needs may vary depending on your project design and complexity. If you're unsure about certain tools, it's always best to consult with a professional or watch instructional videos online.

    Construction Time!:

    Alright, let's get our hands dirty! Building a multi-functional desk involves several steps, which we'll break down into manageable chunks.

    1. Cutting and Joining:

    First, cut your wood pieces to size according to your plan. Measure twice, cut once! Use a circular saw for straight cuts and a jigsaw for curves or intricate shapes. Join your pieces using wood glue and screws for added strength and durability. Ensure all your joints are strong and flush for a professional finish.

    2. Building the Storage Features:

    Now comes the fun part - constructing your storage compartments! For drawers, you'll need to build drawer boxes and install drawer slides. For shelves, simply cut your shelves to size and attach them to the desk frame. If you're incorporating a keyboard tray, make sure it slides smoothly and is at a comfortable height. Remember to add a touch of flair with decorative hardware!

    3. Desk Top Assembly:

    The desktop is the centerpiece of your desk. You can use a single piece of wood or a combination of planks joined together. If you're using planks, ensure they are perfectly aligned and secure. Create a smooth surface by sanding the top well before moving on to the finishing steps.

    4. Finishing Touches:

    Congratulations, you've built the structure! Now it's time to make your desk truly shine. Start by sanding all the surfaces to smooth out any rough edges or imperfections. Then, apply your chosen wood finish - stain, paint, or sealant. Ensure even application and follow the manufacturer's instructions for drying time. Once the finish is dry, you can add any decorative hardware or accents to complete your masterpiece.

    Beyond the Basics: Embellishing Your Desk:

    Now that you have a solid foundation, it's time to unleash your creativity and elevate your desk from good to extraordinary. Here are some inspiring ideas to make your desk truly unique:

    1. Add Some Color:

    Paint your desk a vibrant color to inject personality into your workspace. You can use a single color or get creative with stripes, geometric patterns, or ombre effects. You can also create a distressed look by sanding away some of the paint for a vintage feel.

    2. Embrace Texture:

    Don't be afraid to incorporate textured elements! Use textured wallpaper for a unique look, or add decorative panels made from different materials like leather, metal, or even cork. You can also create your own texture using wood carving techniques or by applying decorative finishes like crackle paint or wood grain transfer paper.

    3. Lighting Solutions:

    Good lighting is essential for a comfortable and productive workspace. Consider adding built-in lighting under the desk top or on the sides, or install an overhead pendant light for a stylish touch. You can also incorporate a small desk lamp with adjustable settings for focused task lighting.

    4. The Finishing Touches:

    Make your desk truly yours by incorporating personal touches. Add a decorative plant, a family photo, or a piece of art that inspires you. Consider using hooks or shelves for hanging items like coats, bags, or even your favorite artwork. The possibilities are endless!

    Troubleshooting and Maintenance:

    Even the best-built desks need a little TLC now and then. Here are some common issues and their solutions:

    1. Loose Joints:

    If you notice any loose joints, tighten screws or reapply wood glue. You can also use wood filler to fill in any gaps or cracks for a seamless finish.

    2. Scratches and Dents:

    Small scratches and dents can be easily repaired with a little sanding and wood filler. For deeper scratches, you may need to use wood putty or a wood repair kit.

    3. Damaged Finish:

    If your desk's finish is chipped or worn, you can sand down the affected area and reapply a fresh coat of finish. Make sure to choose a finish that is compatible with the existing one.

    4. Squeaky Drawers:

    Squeaky drawers can be annoying, but they are easily fixed! Apply some lubricating oil or wax to the drawer slides to reduce friction.

    Conclusion:

    Congratulations, you've now embarked on the incredible journey of building your dream multi-functional wood desk! Remember, this guide is a starting point - embrace your creativity, experiment with different designs, and most importantly, have fun! With a little effort and passion, you'll create a piece of furniture that's as unique as you are. So, grab your tools, gather your materials, and let your woodworking dreams take flight!

    Read More..